hawkBit-101
Tutorial @ EclipseCon Europe 2019
Who we are

Stefan Behl
Bosch Software Innovations GmbH

Dominic Schabel
Bosch Software Innovations GmbH

Shruthi Manavalli Ramanna
Bosch Software Innovations GmbH
Who are you?
Today's mission
- Welcome
- Intro hawkBit
- Tutorial setup
- All things hawkBit
- Q & A
About
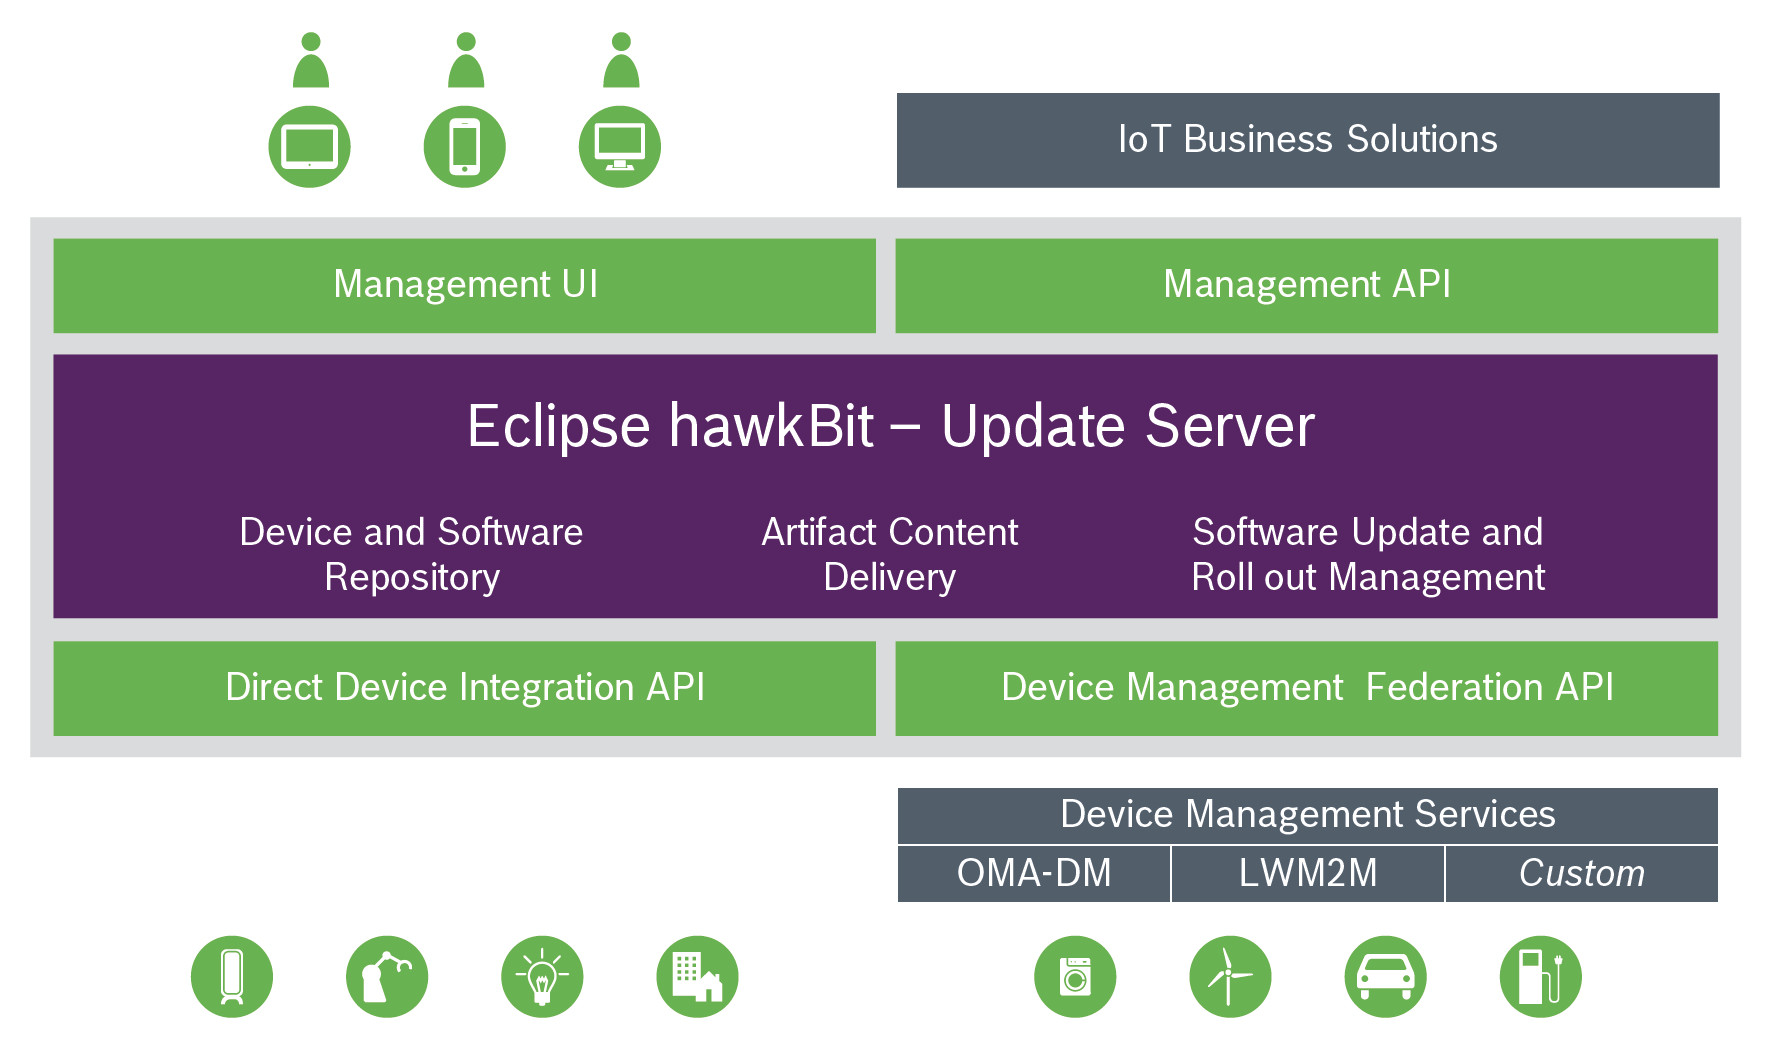
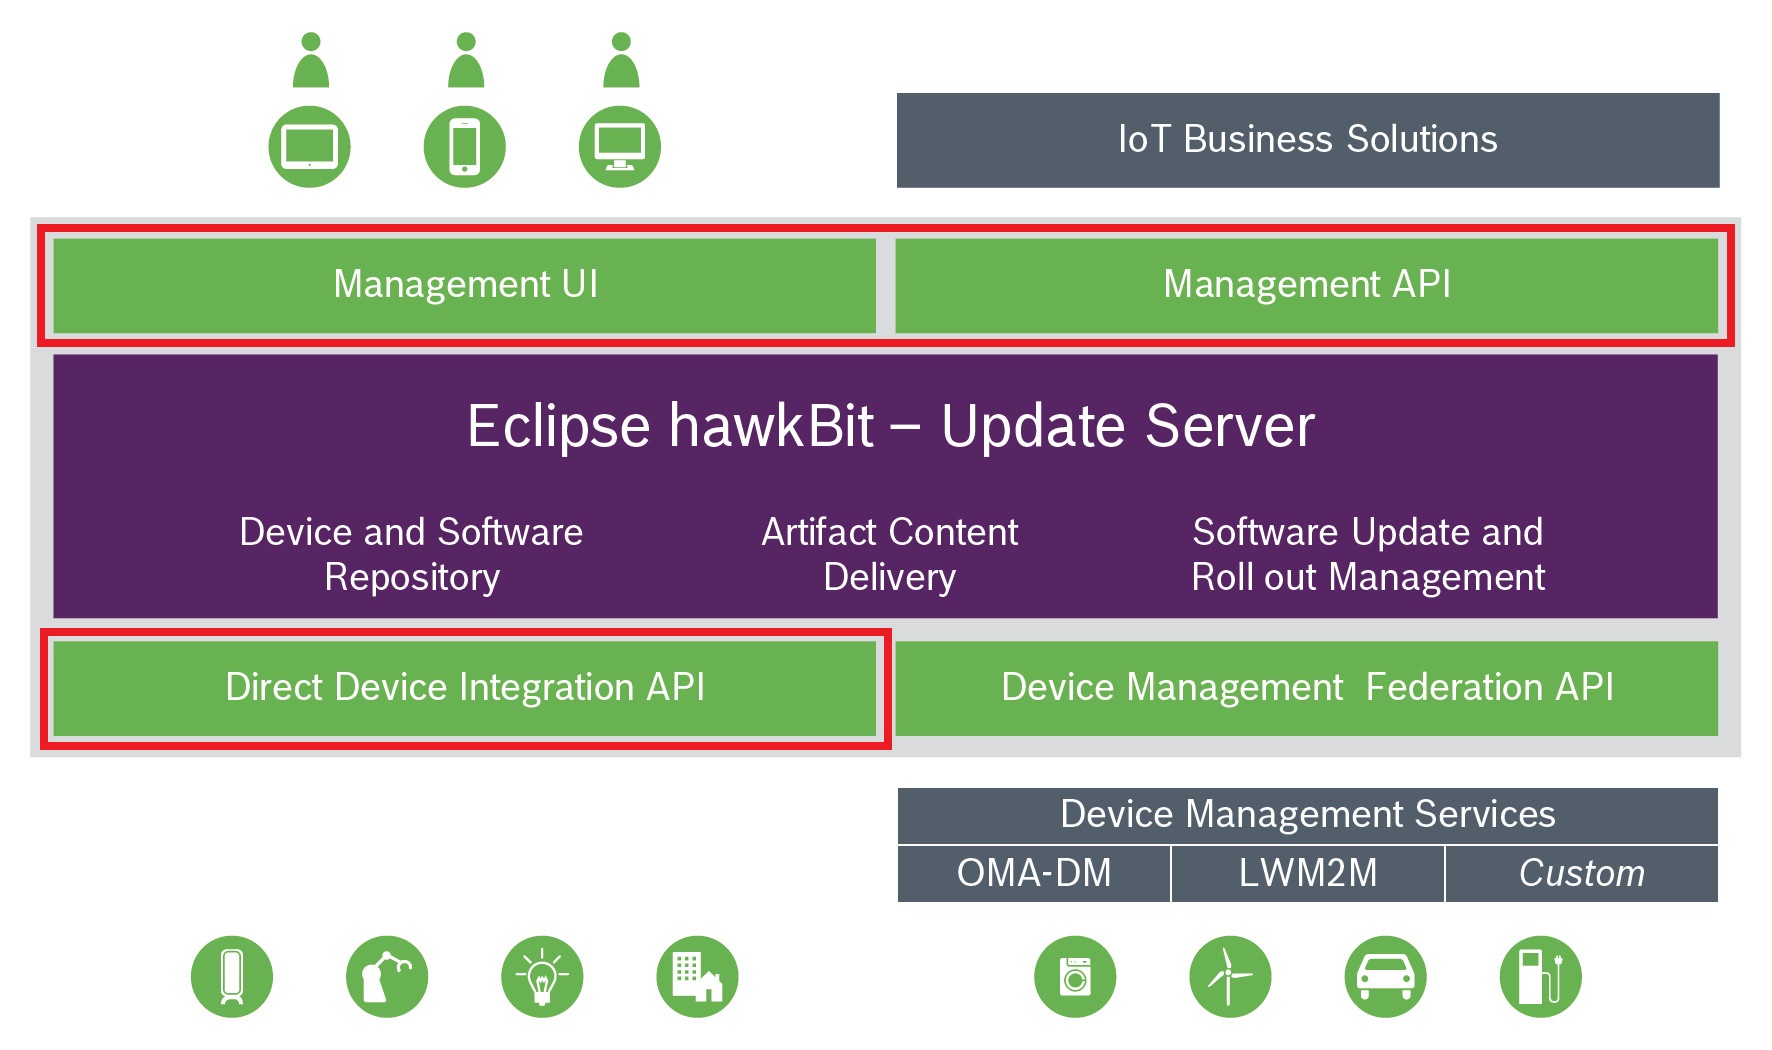
Eclipse hawkBit aims to create a domain-independent backend solution for rolling out software updates to constrained edge devices as well as more powerful controllers and gateways connected to IP based networking infrastructure.
Update Package
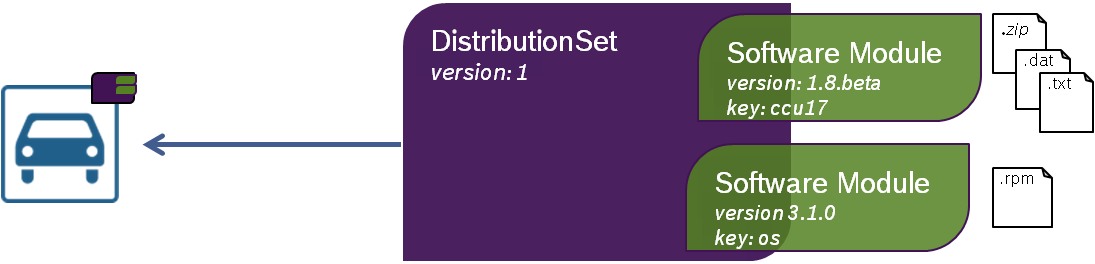
Big Picture
Tutorial Overview
- Provisioning a device
- Creating an update
- Updating a single device
- Updating many devices
Tutorial Resources
Docker Setup
https://github.com/stefbehl/hawkbit-101/blob/master/setup/docker-compose-stack.yml
- hawkBit Update Server v0.3.0M5
- hawkBit Device Simulator
- MySQL database
- Rabbit MQ
                        $ docker swarm init
                        [...]
                        $ docker stack deploy -c docker-compose-stack.yml hawkbit
                        Creating network hawkbit_hawknet
                        Creating service hawkbit_hawkbit
                        Creating service hawkbit_simulator
                        Creating service hawkbit_rabbitmq
                        Creating service hawkbit_mysql
Verify Containers
                        $ docker stack services hawkbit

                        ID                  NAME                MODE                REPLICAS            IMAGE
                        1w1606hovhqt        hawkbit_simulator   replicated          1/1                 hawkbit/hawkbit-device-simulator:latest
                        bc70f9c7hkfs        hawkbit_mysql       replicated          1/1                 mysql:5.7
                        pwafzvwp6b0p        hawkbit_rabbitmq    replicated          1/1                 rabbitmq:3-management
                        tljp62a8g27j        hawkbit_hawkbit     replicated          1/1                 hawkbit/hawkbit-update-server:latest-mysql
Setup Verification
Update Server (via Browser)
Device Simulator (via Browser)
$ docker service update --force hawkbit_simulator
Execution
-
Inline curl2clipboard links
-
curl snippets (copy&paste)
-
Postman
-
Tutorial slides
-
hawkBit Update Server UIadmin /admin
-
hawkBit API documentation
Talk to us if you need help!
Part 1
Provisioning a Device
- Configure target token authentication
- Provisioning a device
- Registering a device
- Setting device attributes
Enable Target Token Authentication
                        HTTP PUT
                        /rest/v1/system/configs/authentication.targettoken.enabled

                        Accept: application/hal+json
                        Authorization: Basic admin:admin
                        Content-Type: application/json
                        Body:
                        {
                          "value": true
                        }
                        HTTP/1.1 200 OK
                        {
                          "value": true,
                          "lastModifiedAt": 1539767150967,
                          "lastModifiedBy": "admin",
                          "createdAt": 1539767150967,
                          "createdBy": "admin",
                          "global": false,
                          "_links": {
                            "self": {
                              "href": "/rest/v1/system/configs/authentication.targettoken.enabled"
                            }
                          }
                        }
Verify in the System Configuration view of the UI that target token authentication is enabled.
Device Pre-Provisioning
                        HTTP POST
                        /rest/v1/targets

                        Accept: application/hal+json
                        Authorization: Basic admin:admin
                        Content-Type: application/json
                        Body:
                        [{
                          "controllerId": "dev01",
                          "name": "Device 01",
                          "description": "My first device"
                        }]
The response contains the security token that can be used by the device to authenticate via DDI:
                        HTTP/1.1 201 Created
                        [{
                          "controllerId": "dev01",
                          "createdBy": "admin",
                          "createdAt": 1539089120222,
                          "lastModifiedBy": "admin",
                          "lastModifiedAt": 1539089120222,
                          "name": "Device 01",
                          "description": "My first device",
                          "updateStatus": "unknown",
                          "securityToken": "742f7f594c157f5885a8c5fbabcb84dd",
                          "requestAttributes": true,
                          "_links": {
                            "self": {
                              "href": "/rest/v1/targets/dev01"
                            }
                          }
                        }]
Verify in the Deployment Management view of the UI that the target has been created. Create another target via the UI.
Device Registration
                          HTTP GET
                          /DEFAULT/controller/v1/{controllerId}

                          Accept: application/hal+json
                          Authorization: TargetToken {targetToken}
The very first time the device "connects" via DDI is used for registering the device.
The response contains a "configData" link to set device attributes (via HTTP PUT).
                        HTTP/1.1 200 OK
                        {
                          "config": {
                            "polling": {
                              "sleep": "00:05:00"
                            }
                          },
                          "_links": {
                            "configData": {
                              "href": "/DEFAULT/controller/v1/dev01/configData"
                            }
                          }
                        }
Verify in the Deployment Management view of the UI that the state of the target changed from UNKNOWN to REGISTERED.
OK, this one is really hard... :-)
Setting Device Attributes
                        HTTP PUT
                        /DEFAULT/controller/v1/{controllerId}/configData

                        Accept: application/hal+json
                        Authorization: TargetToken {targetToken}
                        Content-Type: application/json
                        Body:
                        {
                          "mode": "merge",
                          "data": {
                            "VIN": "JH4TB2H26CC000001",
                            "hwRevision": "1"
                          },
                          "status": {
                            "result": {
                              "finished": "success"
                            },
                            "execution": "closed",
                            "details": []
                          }
                        }'
HTTP/1.1 200 OK
Once the device has sent its attributes, the "configData" link is no longer exposed in the response to a polling request.
You can instruct the device to re-send its (potentially updated) attributes via the UI and Mgmt API.
Verify in the Deployment Management view of the UI that the device attributes are present.
Part 2
Creating an Update
- Creating a software module
- Uploading an artifact
- Creating a distribution set
- Assigning the software module to the distribution set
Creating a Software Module
                        HTTP POST
                        /rest/v1/softwaremodules

                        Accept: application/hal+json
                        Authorization: Basic admin:admin
                        Content-Type: application/json
                        Body:
                        [{
                          "vendor": "Example Ltd.",
                          "name": "MyOS",
                          "description": "First version of MyOS.",
                          "type": "os",
                          "version": "1.0"
                        }]
This will create an "empty" software module of type "OS". Next we will add artifacts to the module.
                        HTTP/1.1 201 CREATED
                        [{
                          [...]
                          "id": 2
                          "name": "MyOS",
                          "description": "First version of MyOS.",
                          "version": "1.0",
                          "type": "os",
                          "vendor": "Example Ltd.",
                          "deleted": false,
                          "_links": {
                            "self": {
                              "href": "/rest/v1/softwaremodules/2"
                            }
                          }
                        }]
Verify in the Distribution Management view of the UI that the software module has been created. Create another software module of type "Application" via the UI.
Uploading an Artifact
                        HTTP POST
                        /rest/v1/softwaremodules/{moduleId}/artifacts

                        Accept: application/hal+json
                        Authorization: Basic admin:admin
                        Content-Type: multipart/form-data;
                          boundary=6o2knFse3p53ty9dmcQvWAIx1zInP11uCfbm
                        Body:
                        --6o2knFse3p53ty9dmcQvWAIx1zInP11uCfbm
                        Content-Disposition: form-data; name=artifact01.file
                        [...]
The uploaded artifact will be associated with the specified software module. The response provides a download link.
                        HTTP/1.1 201 CREATED
                        {
                          [...]
                          "id": 2,
                          "hashes": {
                            "sha1": "d2e7291c2c52b87b2ee00983217e1bcc0909251f",
                            "md5": "b14f29fe8cea6b25e62a8e5c48b5a3a1"
                          },
                          "providedFilename": "artifact01.file",
                          "size": 28,
                          "_links": {
                            "self": {
                              "href": "/rest/v1/softwaremodules/2/artifacts/2"
                            },
                            "download": {
                              "href":
                                "/rest/v1/softwaremodules/2/artifacts/2/download"
                            }
                          }
                        }
Verify in the Upload view of the UI that the artifact is associated with your software module. Upload another artifact for the same software module via the UI.
Creating a Distribution Set
                        HTTP POST
                        /rest/v1/distributionsets

                        Accept: application/hal+json
                        Authorization: Basic admin:admin
                        Content-Type: application/json
                        Body:
                        [{
                          "requiredMigrationStep": false,
                          "name": "MyDS",
                          "description": "My initial distribution",
                          "type": "os",
                          "version": "1.0"
                        }]
Next we need to assign the previously created software module with the new distribution set.
                        HTTP/1.1 201 CREATED
                        [{
                          [...]
                          "id": 2,
                          "name": "MyDS",
                          "description": "My initial distribution",
                          "version": "1.0",
                          "modules": [...],
                          "requiredMigrationStep": false,
                          "type": "os",
                          "complete": true,
                          "deleted": false,
                          "_links": {
                            "self": {
                              "href": "/rest/v1/distributionsets/2"
                            }
                          }
                        }]
Verify in the Distribution Management view of the UI that the distribution set has been created. Inspect its properties, in particular its type.
Assigning a Software Module
                        HTTP POST
                        /rest/v1/distributionsets/{distributionId}/assignedSM

                        Authorization: Basic admin:admin
                        Content-Type: application/json
                        Body:
                        [{
                            "id": "{moduleId}"
                        }]'
Try to assign a software module of type "Application". Why does it fail?
HTTP/1.1 200 OK
                        HTTP/1.1 400 Bad Request
                        {
                          "exceptionClass": "o.e.h.r.e.UnsupportedSoftwareModuleForThisDistributionSetException",
                          "errorCode": "hawkbit.server.error.distributionset.modules.unsupported",
                          "message": "Distribution set type does not contain the given module, i.e. is incompatible."
                        }
Verify your software module assignments in the Distributions Management view of the UI.
Part 3
Updating a Single Device
- Assigning a distribution set to a device
- Polling for updates
- Inspecting the deployment action
- Downloading artifacts
- Providing deployment feedback
Assigning a Distribution Set
                        HTTP POST
                        /rest/v1/distributionsets/{distributionId}/assignedTargets/

                        Accept: application/hal+json
                        Authorization: Basic admin:admin
                        Content-Type: application/json
                        Body:
                        [{
                          "id" : "{targetId}",
                          "type" : "forced"
                        }]
The specified type "forced" instructs the device to apply the update immediately. Alternatives are "soft" and "timeforced".
                        HTTP/1.1 200 OK
                        {
                          "assigned": 1,
                          "alreadyAssigned": 0,
                          "total":1
                        }
Verify in the Deployment Management view of the UI that a deployment action is listed in the action history of your device. Maximize the action history of your device.
Polling for Updates
                        HTTP GET
                        /DEFAULT/controller/v1/{controllerId}

                        Accept: application/hal+json
                        Authorization: TargetToken {targetToken}
The response contains a "deploymentBase" link that can be used by the device to get all the information needed to process the assigned update.
                        HTTP/1.1 200 OK
                        {
                          "config": {
                            "polling": {
                              "sleep": "00:05:00"
                            }
                          },
                          "_links": {
                            "deploymentBase": {
                              "href": "/DEFAULT/controller/v1/dev01/deploymentBase/1"
                            }
                          }
                        }
Inspecting the Deployment Action
                        HTTP GET
                        /DEFAULT/controller/v1/{controllerId}
                            /deploymentBase/{actionId}

                        Accept: application/hal+json
                        Authorization: TargetToken {targetToken}
The response contains an array of chunks, each representing a software module. For each software module there is an array of artifacts providing the artifact download URLs and checksums.
                        HTTP/1.1 200 OK
                        {
                          "id": "1",
                          "deployment": {
                            "download": "forced",
                            "update": "forced",
                            "chunks": [{
                              "part": "os",
                              "version": "1",
                              "name": "os1",
                              "artifacts": [{
                                "filename": "test_large.txt",
                                "hashes": {...},
                                "size": 3400321,
                                "_links": {
                                  "download-http": {
                                    "href": "/DEFAULT/controller/v1/dev01/softwaremodules/1/artifacts/test_large.txt"
                                  },
                                  "md5sum-http": {
                                    "href": "/DEFAULT/controller/v1/dev01/softwaremodules/1/artifacts/test_large.txt.MD5SUM"
                                  }
                                }
                              }
                            ]}
                          ]}
                        }
Verify in the action history of the Deployment Management view that the update was retrieved by the device.
Downloading an Artifact
                        HTTP GET
                        /DEFAULT/controller/v1/{controllerId}
                            /softwaremodules/{moduleId}/artifacts/{filename}

                        Authorization: TargetToken {targetToken}
You can configure that devices are allowed to download artifacts w/o providing a security token.
                        HTTP/1.1 200 OK

                        This is a test update file
Verify in the action history of the Deployment Management view
that the device has downloaded the artifact.
Providing Intermediary Feedback
                        HTTP POST
                        /DEFAULT/controller/v1/{controllerId}
                            /deploymentBase/{actionId}/feedback

                        Authorization: TargetToken {targetToken}
                        Content-Type: application/json
                        Body:
                        {
                          "id" : "{actionId}",
                          "status" : {
                            "result": {
                              "progress": {
                                "cnt": 2,
                                "of": 5
                              },
                              "finished": "none"
                            },
                            "execution": "proceeding",
                            "details": ["The update is being processed."]
                          }
                        }
HTTP/1.1 200 OK
Devices can provide arbitrary feedback (e.g. fine granular progress updates) which does not cause state transitions in the deployment action workflow.
Verify in the action history of the Deployment Management view that your progress message appears in the list. Send another feedback message.
Providing Deployment Feedback
                        HTTP POST
                        /DEFAULT/controller/v1/{controllerId}
                            /deploymentBase/{actionId}/feedback

                        Authorization: TargetToken {targetToken}
                        Content-Type: application/json
                        Body:
                        {
                          "id": "{actionId}",
                          "status": {
                            "result": {
                              "finished": "success"
                            },
                            "execution": "closed",
                            "details": ["The update was successfully installed."]
                          }
                        }
HTTP/1.1 200 OK
This action finishes the deployment action workflow and pushes the action into state "Finished". Further feedback requests are rejected with "HTTP/1.1 410 GONE".
Verify in the Deployment Management view of the UI that the deployment action is in state "Finished".
Part 4
Updating Many Devices
- Configure gateway token authentication
- Provision many devices
- Create a rollout
- Start a rollout
Enable Gateway Token Authentication
                        HTTP PUT
                        /rest/v1/system/configs/authentication.gatewaytoken.enabled

                        Accept: application/hal+json
                        Authorization: Basic admin:admin
                        Content-Type: application/json
                        Body:
                        {
                          "value" : true
                        }
This allows a gateway to authenticate on behalf of the devices that are connected to it. The device simulator acts like a gateway and relies on this authentication mechanism.
                        HTTP/1.1 200 OK
                        {
                          "value": true,
                          "lastModifiedAt": 1539682103744,
                          "lastModifiedBy": "admin",
                          "createdAt": 1539682103744,
                          "createdBy": "admin",
                          "global": false,
                          "_links": {
                            "self": {
                              "href":
                                "/rest/v1/system/configs/authentication.gatewaytoken.enabled"
                            }
                          }
                        }
Initialize Gateway Token
                        HTTP PUT
                        /rest/v1/system/configs/authentication.gatewaytoken.key

                        Accept: application/hal+json
                        Authorization: Basic admin:admin
                        Content-Type: application/json
                        Body:
                        {
                          "value": "e61C6b2B78A674d19304c357a20f1D09"
                        }
                        HTTP/1.1 200 OK
                        {
                          "value": "e61C6b2B78A674d19304c357a20f1D09",
                          "lastModifiedAt": 1539682107943,
                          "lastModifiedBy": "admin",
                          "createdAt": 1539682107943,
                          "createdBy": "admin",
                          "global": false,
                          "_links": {
                            "self": {
                              "href":
                                "/rest/v1/system/configs/authentication.gatewaytoken.key"
                            }
                          }
                        }
Verify in the System Configuration view of the UI that gateway token authentication is enabled and that the correct token is set.
Provisioning Many Devices
                        HTTP GET
                        {deviceSimulatorBaseURL}/start

                        Query Parameters:
                          name = emeadevice
                          amount = 15
                          tenant = DEFAULT
                          api = ddi
                          endpoint = http://hawkbit:8080
                          gatewaytoken = {gatewayToken}
                        HTTP GET
                        {deviceSimulatorBaseURL}/start

                        Query Parameters:
                          name = apacdevice
                          amount = 20
                          tenant = DEFAULT
                          api = ddi
                          endpoint = http://hawkbit:8080
                          gatewaytoken = {gatewayToken}
                        HTTP GET
                        {deviceSimulatorBaseURL}/start

                        Query Parameters:
                          name = amerdevice
                          amount = 30
                          tenant = DEFAULT
                          api = ddi
                          endpoint = http://hawkbit:8080
                          gatewaytoken = {gatewayToken}
Verify in the Deployment Management view of the UI that the devices are present.
Creating a Rollout
                        HTTP POST
                        /rest/v1/rollouts

                        Accept: application/hal+json
                        Authorization: Basic admin:admin
                        Content-Type: application/json
                        Body:
                        {
                          "distributionSetId" : {distributionId},
                          "targetFilterQuery" : "description=='\''Plug and Play*'\''",
                          "name" : "MyOS-Global-Rollout-1.0",
                          "description" : "Global rollout of MyOS",
                          "groups" : [{
                            "name" : "EMEA_Devices",
                            "description" : "Devices in EMEA",                        HTTP GET
                        {deviceSimulatorBaseURL}/start

                        Query Parameters:
                          name = emeadevice
                          amount = 15
                          tenant = DEFAULT
                          api = ddi
                          endpoint = http://hawkbit:8080
                          gatewaytoken = {gatewayToken}

                            "targetFilterQuery" : "name==emea*",
                            "successCondition" : {
                              "condition" : "THRESHOLD",
                              "expression" : "70"
                            },
                            "successAction" : {
                              "expression" : "",
                              "action" : "NEXTGROUP"
                            },
                            "errorAction" : {
                              "expression" : "",
                              "action" : "PAUSE"
                            },
                            "errorCondition" : {
                              "condition" : "THRESHOLD",
                              "expression" : "20"
                            }
                          }, {
                            "name" : "APAC_Devices",
                            "description" : "Devices in APAC",
                            "targetFilterQuery" : "name==apac*",
                            [...]
                          }]
                        }'
                        HTTP/1.1 201 CREATED
                        {
                          [...]
                          "id": 1,
                          "name": "MyOS-Global-Rollout-1.0",
                          "description": "Global rollout of MyOS",
                          "targetFilterQuery": "description=='Plug and Play*'",
                          "distributionSetId": 1,
                          "status": "creating",
                          "totalTargets": 65,
                          "totalTargetsPerStatus": {
                            "running":0,
                            "notstarted": 65,
                            "scheduled": 0,
                            "cancelled": 0,
                            "finished": 0,
                            "error": 0
                          },
                          "_links": {
                            "start": {
                              "href": "/rest/v1/rollouts/1/start"
                            },
                            "pause": {
                              "href": "/rest/v1/rollouts/1/pause"
                            },
                            "resume": {
                              "href": "/rest/v1/rollouts/1/resume"
                            },
                            "groups": {
                              "href": "/rest/v1/rollouts/1/deploygroups?offset=0&limit=50{&sort,q}",
                              "templated":true
                            },
                            "self":{
                              "href":"/rest/v1/rollouts/1"
                            }
                          }
                        }
Verify in the Rollout Management view of the UI that the rollout is present. Drill down into the rollout to review the three groups.
Starting the Rollout
                        HTTP POST
                        /rest/v1/rollouts/{rolloutId}/start

                        Authorization: Basic admin:admin
The rollout has been started. Keep in mind that the devices are being simulated by our Device Simulator. The Device Simulator sends deployment feedback messages on behalf of its devices.
HTTP/1.1 200 OK
Verify in the Rollout Management view of the UI that the rollout is now being processed. Watch the progress bars of the rollout groups.
Creating a Target Filter for "EMEA"
                        HTTP POST
                        /rest/v1/targetfilters

                        Accept: application/hal+json
                        Authorization: Basic admin:admin
                        Content-Type: application/json
                        Body:
                        {
                          "query": "name==emeadevice*",
                          "name" : "EMEA_Devices"
                        }
This will create a new filter which selects all devices matching the specified name prefix.
                        HTTP/1.1 201 CREATED
                        {
                          "id": 1,
                          [...]
                          "name": "EMEA_Devices",                        HTTP GET
                        {deviceSimulatorBaseURL}/start

                        Query Parameters:
                          name = emeadevice
                          amount = 15
                          tenant = DEFAULT
                          api = ddi
                          endpoint = http://hawkbit:8080
                          gatewaytoken = {gatewayToken}

                          "query": "name==emeadevice*",
                          "autoAssignDistributionSet": null,
                          "_links": {
                            "self": {
                              "href": "/rest/v1/targetfilters/1"
                            },
                            "autoAssignDS": {
                              "href": "/rest/v1/targetfilters/1/autoAssignDS"
                            }
                          }
                        }
Verify in the Target Filter Management view of the UI that the filter is there. Select the filter and review the list of devices.
Create another filter via the UI. Play around with the auto completion function to get familiar with the FIQL syntax.
Setting an Auto Assignment Distribution
                        HTTP POST
                        /rest/v1/targetfilters/1/autoAssignDS

                        Accept: application/hal+json
                        Authorization: Basic admin:admin
                        Content-Type: application/json
                        Body:
                        {
                          "id": "1"
                        }
Target filters with an "Auto Assignment Distribution Set" are resolved periodically. If the resolution result returns devices that do not have this distribution set assigned yet, hawkBit will assign it automatically.
                        HTTP/1.1 200 OK
                        {
                          "id": 1,
                          [...]
                          "name": "EMEA_Devices",
                          "query": "name==emeadevice*",
                          "autoAssignDistributionSet": 1,
                          "_links": {
                            "self": {
                              "href": "/rest/v1/targetfilters/1"
                            },
                            "autoAssignDS": {
                              "href": "/rest/v1/targetfilters/1/autoAssignDS"
                            }
                          }
                        }
Verify in the Target Filter Management view of the UI that the filter is now associated with the distribution set. Let's now create some new devices matching our filter...
Creating Some More "EMEA Devices"
                        HTTP GET
                        {deviceSimulatorBaseURL}/start

                        Query Parameters:
                          name = emeadevice
                          amount = 30
                          tenant = DEFAULT
                          api = ddi
                          endpoint = http://hawkbit:8080
                          gatewaytoken = {gatewayToken}
Once the target filter is executed for the next time, the devices are automatically updated with the distribution set of the filter.
                        HTTP/1.1 200 OK

                        Updated 30 DDI_HTTP connected targets!
Verify in the Target Filter Management view of the UI that the filter captures the new devices. Watch the state of the devices.
Try to understand the difference between a "Rollout" and an "Auto Assignment"!
Outlook
- Vaadin 8 (#880)
- Release 0.3.0 (#784)
- Prioritization of updates (#863)
- Integration with other device inventories (#796)
- Support of new Eclipse IoT Packages project